Showing posts with label LINUX. Show all posts

Wednesday, January 5, 2011

// // Leave a Comment

Puppy Linux: Installing The Distro....

Installing Puppy Linux

Ready, Set, Go!

With the Puppy Linux Distro burned onto a CD from its downloaded ISO image, and a computer that is ready and willing to accept this fascinating little Linux-based distribution, you are now ready to commence the installation process. And while there are a few options available for end-users to choose from during the installation, it is always advisable to stick to the default settings offered during the installation process.
Before commencing, make sure that your computer is capable of booting from the CD-ROM. You will first need to run the Live CD version before installing it. This is also a good practice run to ensure that your hardware is capable of running Puppy Linux.

Booting From CD
  • Insert your Puppy Linux CD into the CD-ROM drive of your computer.
  • Power up your system and allow it to boot from the CD.
During the initial boot from CD, you will only be prompted for a select number of variables. Additionally, the selection process also provides detailed information on the available options, allowing you to make the proper decision. But, it is advisable to choose those options they recommend, as they have been proven to be highly effective and operational over the other available options.
  • Select the keyboard layout you are using (the default setting is QWERTY - USA).
  • Select the XORG graphics mode.
  • Select the default resolution setting (this is typically 1024x768x16).
Following the resolution settings, you will be greeted with the Puppy Linux desktop. Notice the pink colored bar across the top center. Click on it to get a quick "How To" tutorial about Puppy Linux. But if you prefer to jump right in and permanently install it on your hard drive... follow me.

Hard Drive Installation

Puppy Linux

Install To Hard Drive
Puppy Linux has a really neat feature called the Puppy Universal Installer. This is an installation wizard designed for the purpose of installing Puppy Linux on a number of different devices: from USB flash drives to CDs and even the hard drive. Today we will focus on installing Puppy Linux on your hard drive. The process will also depend on variables you will supply answers to: selecting default settings where applicable and/or recommended.
  • Right click on your desktop, and under Setup, select Puppy Universal installer.
  • From the available media options, select Internal (IDE or SATA) hard drive.
  • Choose the drive you wish to install it to, if more than one is displayed.
  • Puppy Linux will display the specifications of the drive you are about to use.
NOTE: It is highly advisable to install on a hard drive that has been formated with either EXT2 or EXT3 file system. If your hard drive is not reflecting either of these file systems, you should run GParted application to correct this.
  • When ready to install onto the hard drive, click the icon next to Install Puppy to... (Please note that the drive description could change from one system to another based on configuration. In the case of most older single IDE drive based computers, this will typically display as SDA1.)
  • Acknowledge your selection to install the distro to the hard drive by clicking on the OK button.
  • Select the CD option on the next window. This tells the wizard where the installation files reside.
  • Make sure the CD is still in the drive and click OK to proceed.
  • Select the FULL installation option to install Puppy Linux on the entire drive. (Although the Wizard recommends the Frugal option, it is best to dedicate the entire drive to Puppy Linux, since this is what we are actually aiming to do. If you prefer to run the Frugal option, you will need to choose partition sizes and other variables that may not be suitable for beginners. More experienced Linux users will typically choose the Frugal option.)
  • Puppy Linux will begin its installation to the hard drive and prompt you when it is done.
  • For its booting option, select Install/Update GRUB.
  • Select Install to proceed; then choose OK at the next window to confirm.
  • For the GRUB Configuration, choose the default simple value and click on OK.
  • Choose the default standard resolution and click on OK.
  • For the GRUB partition, keep the default path and click OK.
  • For the GRUB destination, keep the default Root value and click OK.
  • When the installation is complete, you will see the GRUB INSTALL SUCCESS window. Click OK.
  • You may be prompted to reinstall GRUB. If so, simply select No to exit.


Finalizing The Installation

Making Puppy Linux Bootable From Your Hard Drive
When done, reboot the computer. During this first reboot following the installation, you will be prompted to save a few configuration files.
  • Save your session by selecting SAVE TO FILE.
  • On the warning message that follows, select OK to proceed.
  • Keep the default partition to create the pup_save.2fs file and select OK to proceed.
  • Allow the system to generate its own name for the file... just select OK without entering anything in the blank field.
  • Select Normal for no encryption.
  • Keep the default value of 512MB for the personal save file and select OK to proceed.
  • Verify your settings in the Final Insanity Check window and select YES, SAVE to finalize.
  • The last part of the install asks if you wish to install other save files onto the hard drive. Before responding, make sure that the CD is back in the drive and select Yes. (Depending on the size of these files, the process will take a little while to complete. This is normal.)
  • Once complete, the system will complete the reboot process that was previously initiated.
Booting Up For The First Time
Following the reboot, Puppy Linux will display a couple of options following the Linux choice. Unless there is a booting problem, there is no need to choose any of the GRUB related options. Simply press the enter key on this screen to continue the booting process.
During the very first boot of Puppy Linux, you may be prompted to select the keyboard, video mode and resolutions. Choose the default values and proceed to boot into Puppy Linux. Following this initial boot, you will not see these 3 variables prompt you for a selection again, unless a corresponding piece of hardware is modified and the OS detects it.
You are now officially ready to enjoy Puppy Linux!


THATS ALL...ANY PROBS MAIL ME.PRINCEFUNNY64@GMAIL.COM
Read More

Friday, December 10, 2010

// // Leave a Comment

YOU CAN INSTALL OS IN USING PENDRIVE

Add caption

Introduction

UNetbootin allows you to create bootable Live USB drives for Ubuntu, Fedora, and other Linux distributions without burning a CD. It runs on both Windows and Linux. You can either let UNetbootin download one of the many distributions supported out-of-the-box for you, or supply your own Linux .iso file if you've already downloaded one or your preferred distribution isn't on the list.


Requirements

  • Microsoft Windows 2000/XP/Vista/7, or Linux.
  • Internet access for downloading a distribution to install, or a pre-downloaded ISO file


Features

UNetbootin can create a bootable Live USB drive, or it can make a "frugal install" on your local hard disk if you don't have a USB drive. It loads distributions either by downloading a ISO (CD image) files for you, or by using an ISO file you've already downloaded.


screenshot

The current version has built-in support for automatically downloading and loading the following distributions, though installing other distributions is also supported:


  PLZ VISIT THIS SITE FOR DETAILS


Read More

Tuesday, September 22, 2009

// // Leave a Comment

What's new in Linux Mint 7 Gloria KDE Community Edition?

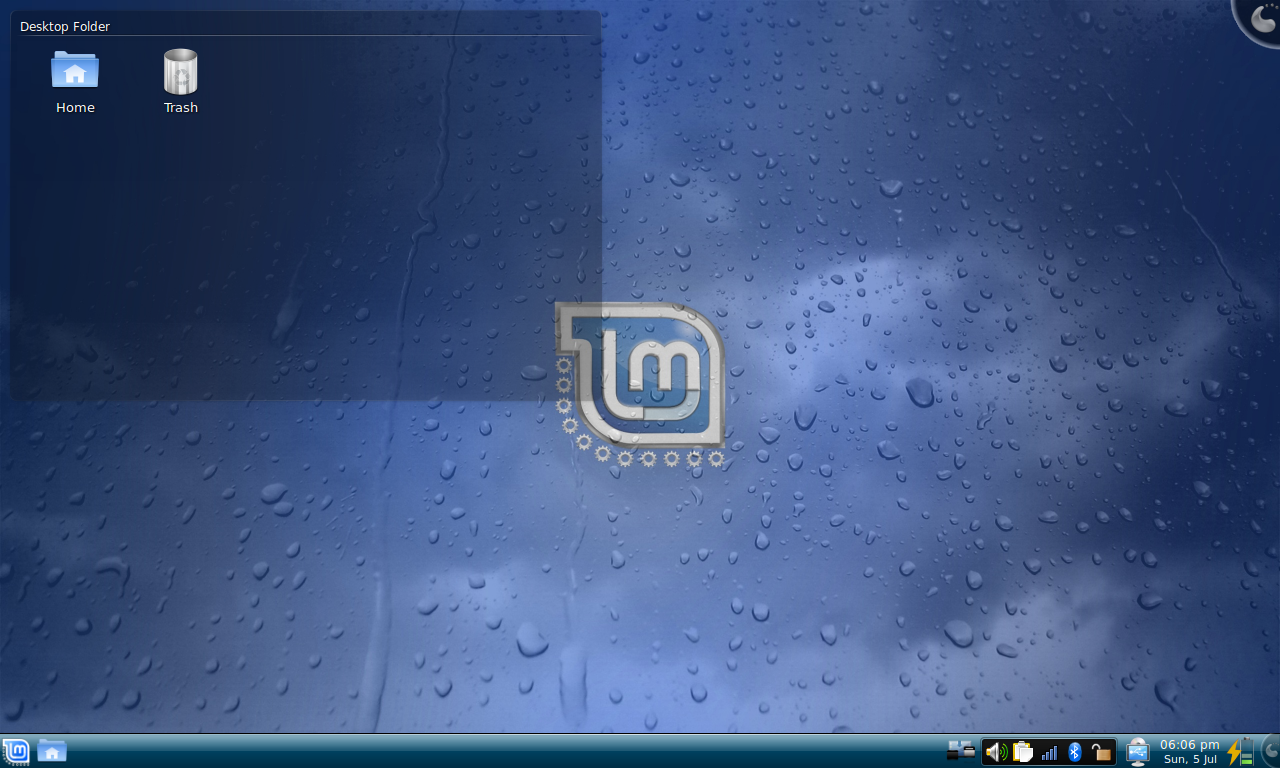
Based on Kubuntu 9.04 Jaunty Jackalope, Linux 2.6.28, KDE 4.2.4 and Xorg 7.4, Linux Mint 7 "Gloria" KDE Community Edition features a lot of improvements and the latest software from the Open Source World.

Linux Mint 7 "Gloria" KDE Community Edition


KDE 4.2.4 and Amarok 2.1

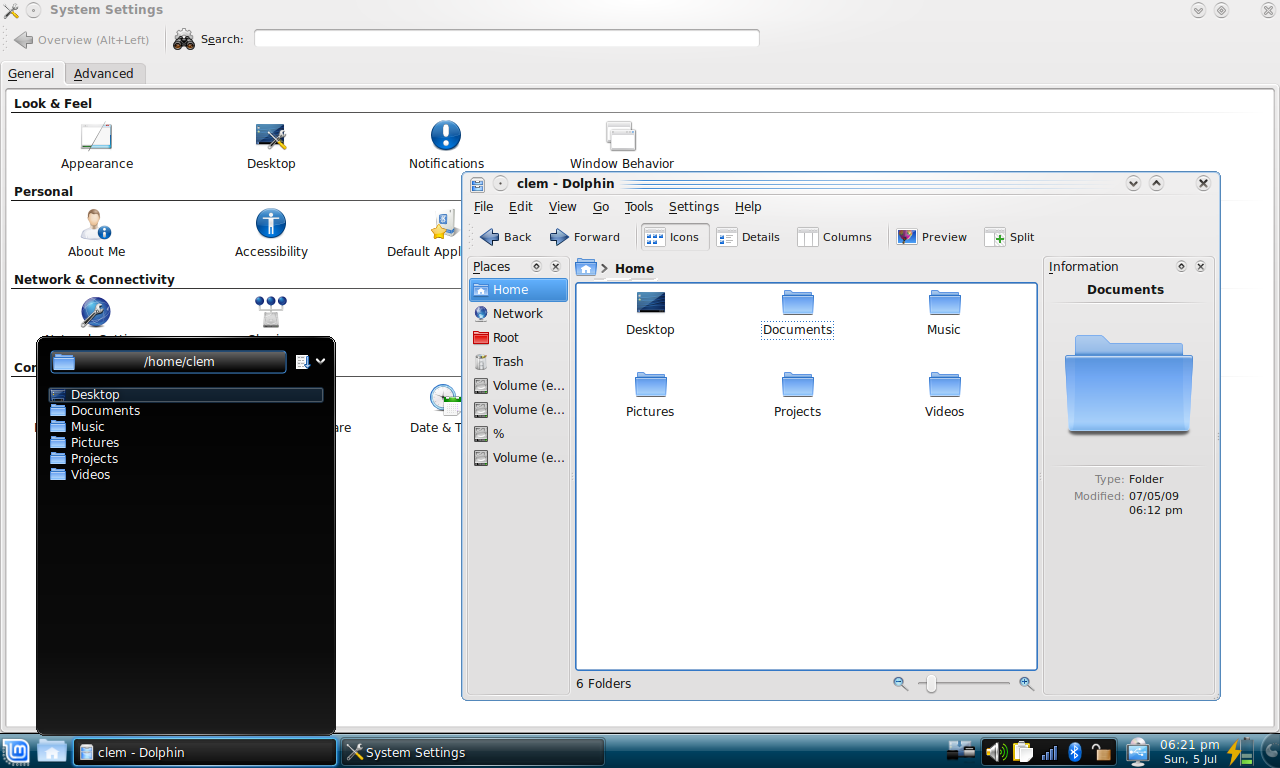
Highlights: The latest and shiniest KDE desktop and applications Linux Mint 7 KDE Community Edition uses the brand new KDE 4.2.4:

KDE 4.2.4
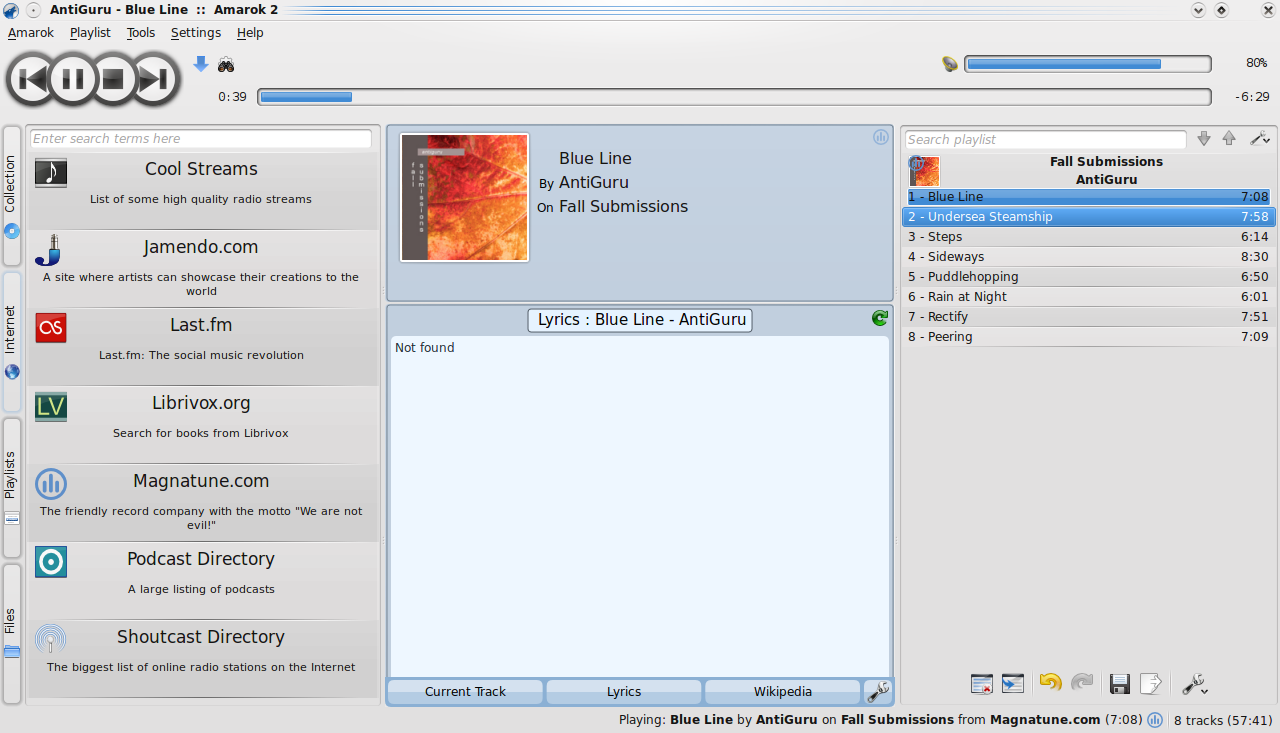
And it also comes bundled with Amarok 2.1:

Amarok 2.1

mintInstall improvements

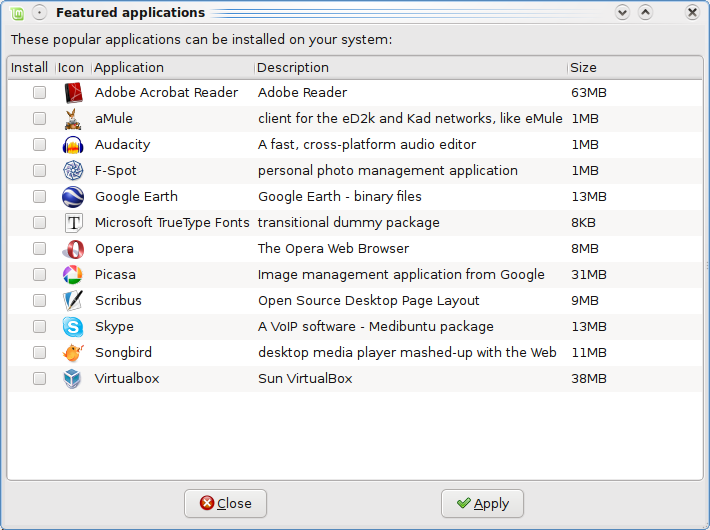
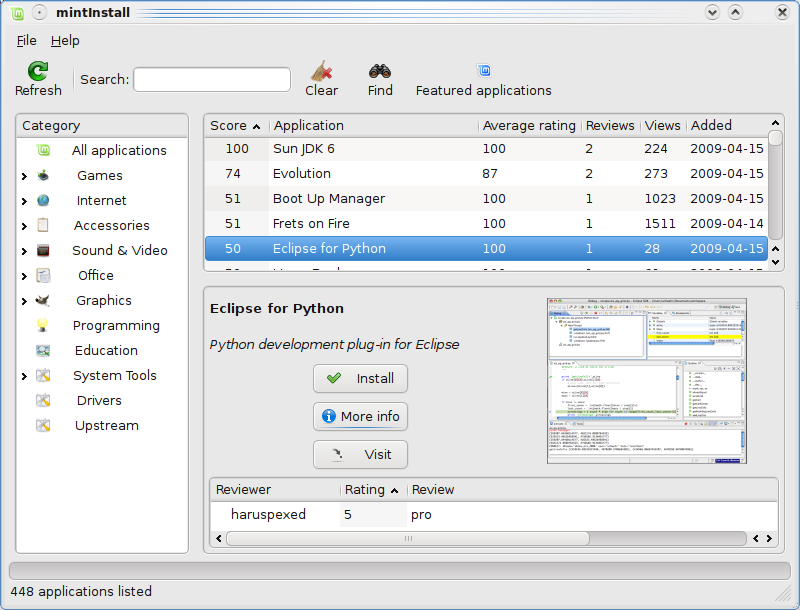
Highlights: Featured applications, pre-filled information, seamless screenshots downloads, improved GUI layout Some of the most popular applications were gathered in a new window named "Featured applications". This window shows the popular applications which are available and not currently installed on the system:

Featured applications in mintInstall
This makes it simpler for you to install most of what people are commonly looking for, all in one go.
The mintInstall frontend now comes pre-filled with all the data required to browse and install software, with the exception of the screenshots. Compared to the older versions of mintInstall this means you don't actually need to refresh the application to be able to use it.
When missing, screenshots are downloaded automatically. Of course, the "Refresh" button can still be used to download all of them at once.


The GUI layout was improved. The main window now shows less information and the once called "Versions" button was replaced with "More info".


mintInstall's main window
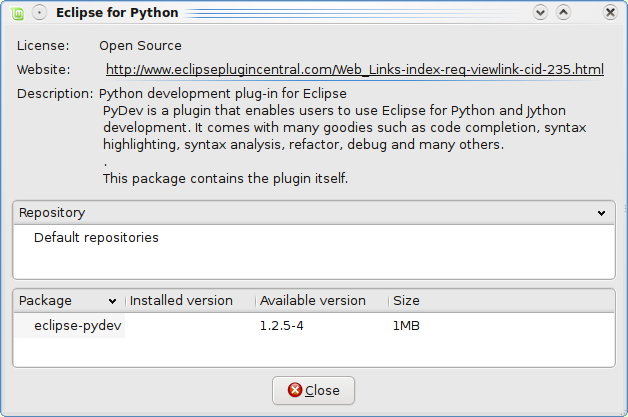
This opens a window where you can see the versions, licenses, package names and repositories, but now also the upstream website, a long description, and the size of the packages.

mintInstall's "More Info" window
MintInstall now runs in root mode and doesn't store any information in your home folder anymore.

mintUpdate improvements

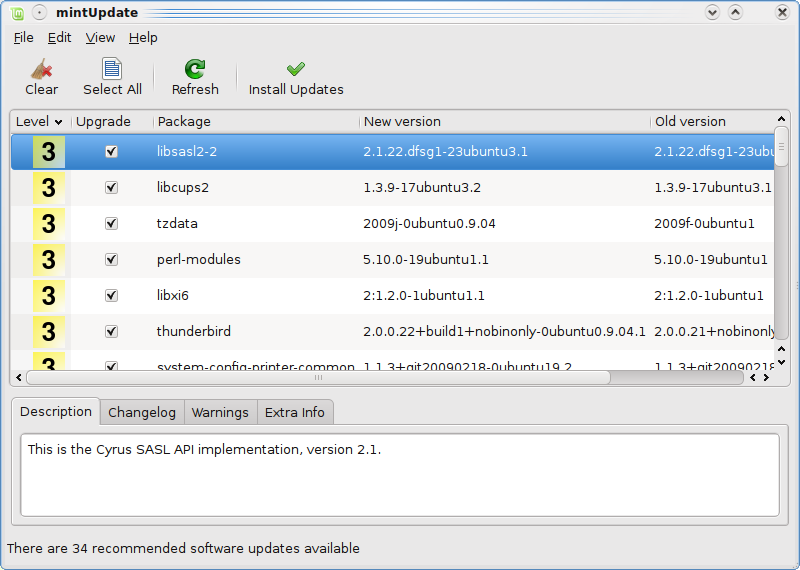
Highlights: Changelogs, package sizes, usability, The changelog tab now supports Linux Mint packages. Previous versions of mintUpdate could only show changelogs for packages maintained by Ubuntu.
mintUpdate now shows the download size associated with each package upgrade.

mintUpdate now shows the download size of each upgrade and supports Linux Mint changelogs.
mintUpdate's system tray icon does not blink anymore. The presence of available updates is still quite noticeable as different icons are being used. The update manager now feels even less intrusive.

mintUpload improvements

Highlights: Ads-free, GUI improvements, graphical service manager, SCP/SFTP support All ads were removed from the the default service.
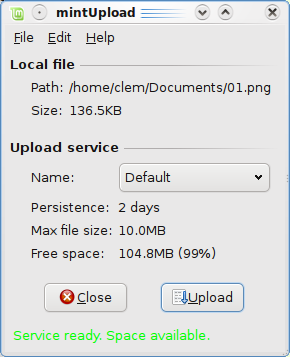
The GUI layout was improved in mintUpload to make the application simpler to use and to hide information which wasn't relevant to the selected upload service.


mintUpload's main window
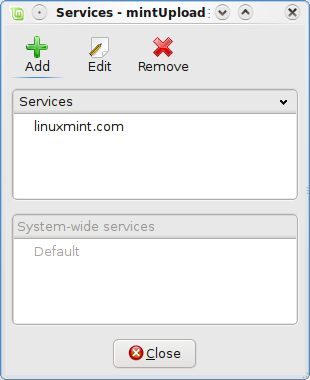
Services can now be created, edited or deleted graphically via a new service manager.

mintUpload's new service manager

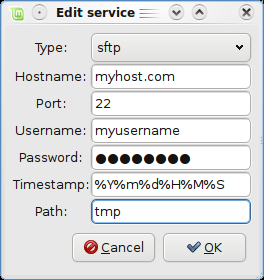
Editing a service in mintUpload
Two new protocols are supported by mintUpload: SCP and SFTP.
Credits go to Philip Morrell, Manuel Sandoval, and Dennis Schwertel for their work on the SCP/SFTP support and for their continuous help in improving mintUpload.

mintWelcome

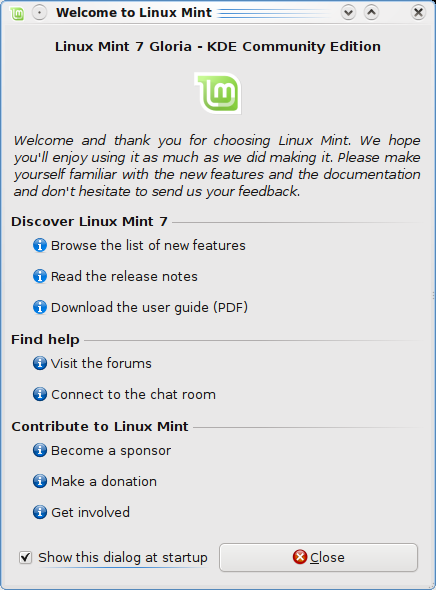
Linux Mint now comes with the following welcome screen:

mintWelcome pointing new users to a few directions

Command line goodies - apt version, rtfm

You can quickly get the version of an installed package by typing "apt version" followed by the package name. For instance, "apt version firefox" gives you the version number of the firefox package.
RTFM is not an insult anymore, it's now a command. It's a simple link to the "man" command of course and it's nothing special, but if someone ever RTFMs you after you've asked questions on the IRC, don't feel bad about it, just say thank you. This is our way to make fun of the unfortunately well-established RTFM syndrom and we hope, if anything, you find it amusing.

Other improvements

Firefox now comes with the Moonlight plugin and support for Silverlight 1.x.
The Firefox google search engine was enhanced to show links to popular search engines, as well as cached links and similar pages.
The Linux Mint 7 Gloria repositories are now signed.
Changes in the packages organization and the introduction of the mint-info virtual package make it easier to add additional desktops environments and editions on top of other ones. The new package hierarchy also makes it easier to upgrade Linux Mint.
mintSystem now comes with a new adjustment system, which restores important files at boot time. This strengthens the system against Ubuntu package upgrades overwriting Mint's specific configuration. This adjustment system can be configured in /etc/linuxmint/mintSystem.conf.
It is now possible to check the integrity of the liveCD and to boot the installer on its own.
MintAssistant was removed, and the installer now applies the same password to root as the one you choose for the main user.
Quassel now replaces Konversation as the default IRC client.
Small improvements:
  • "apt purge" was fixed.
  • "apt source" now runs in user mode.
  • All Mint tools are now launchable from the command line.
  • All Mint tools now detect their environment and adapt to it. In particular they know whether to use gksu or kdesudo. The consequence of this is that packages like mintupdate-gnome or mintupdate-kde are not needed anymore, and the same package is now compatible with all desktop environments.
  • All Mint tools using an about dialog now show their own version number.

Upstream Improvements

Linux Mint 7 Gloria comes with a linux 2.6.28 kernel.
The Ubiquity installer features graphical improvements and support for the ext4 filesystem.
Ubuntu 9.04 also introduced better notifications, faster boot times, enhanced suspend-and-resume and better switching between Wi-Fi and 3G connections.
Read More
// // Leave a Comment

Linux Mint 7 ‘Gloria’ KDE released!

The team is proud to announce the release of Linux Mint 7 ‘Gloria’ KDE.

Quick steps:
Introduction to Linux Mint 7 KDE:
The KDE Community Edition aims to provide a version of Linux Mint which uses the KDE desktop.
For a detailed overview of the new features and improvements included in Linux Mint 7 KDE, please read “What’s new in Gloria KDE?“.
System requirements:
A minimum of 4GB of free space and 256MB RAM are needed. For a comfortable experience we recommended to have at least 512MB RAM and 10GB of free space.
Important information and known issues:
For a complete list of known issues read the Release Notes.
The root password is now set as the same as the one chosen during the installation.
If you’re using Mint tools in other distributions, make sure to turn off the adjustment system by editing /etc/linuxmint/mintSystem.conf.
Download Linux Mint 7 KDE:
You can download the Main Edition via torrent or via HTTP:
Size: 1.1GB LiveDVD
MD5Sum: 60d7b284446b6fdaf58cba91446ff5ff
Asia:
Europe:
Northern America:
Rest of the World:

Order Linux Mint 7 KDE on DVD:
Our partner on-disk.com ships Linux Mint 7 KDE Worldwide for as little as $10. They also contribute $5.41 to Linux Mint for each DVD sold.
Linux Mint 7 KDE can be purchased as a liveDVD, as a virtual machine or as a live media (Flash/SD/CF):
Upgrade instructions:
Upgrade instructions will be published in a few days.
Feedback, ideas, bug reports:
We look forward to reading your reviews and your feedback. If you find bugs, don’t hesitate to report them at https://bugs.launchpad.net/linuxmint and if you have ideas that you would like implemented, don’t hesitate to register blueprints at https://blueprints.launchpad.net/linuxmint
Enjoy!
Enjoy this new version of the KDE edition and don’t hesitate to send us your feedback. Congratulations and thanks to the maintainer, Jamie Boo Birse, for the excellent work done on this release.
Have a lot of fun and thanks for using Linux Mint.
Read More

Saturday, September 5, 2009

// // Leave a Comment

How Linux boots

As it turns out, there isn't much to the boot process:

   1. A boot loader finds the kernel image on the disk, loads it into memory, and starts it.
   2. The kernel initializes the devices and its drivers.
   3. The kernel mounts the root filesystem.
   4. The kernel starts a program called init.
   5. init sets the rest of the processes in motion.
   6. The last processes that init starts as part of the boot sequence allow you to log in.

Identifying each stage of the boot process is invaluable in fixing boot problems and understanding the system as a whole. To start, zero in on the boot loader, which is the initial screen or prompt you get after the computer does its power-on self-test, asking which operating system to run. After you make a choice, the boot loader runs the Linux kernel, handing control of the system to the kernel.

There is a detailed discussion of the kernel elsewhere in this book from which this article is excerpted. This article covers the kernel initialization stage, the stage when the kernel prints a bunch of messages about the hardware present on the system. The kernel starts init just after it displays a message proclaiming that the kernel has mounted the root filesystem:

VFS: Mounted root (ext2 filesystem) readonly.

Soon after, you will see a message about init starting, followed by system service startup messages, and finally you get a login prompt of some sort.

NOTE On Red Hat Linux, the init note is especially obvious, because it "welcomes" you to "Red Hat Linux." All messages thereafter show success or failure in brackets at the right-hand side of the screen.

Most of this chapter deals with init, because it is the part of the boot sequence where you have the most control.
init

There is nothing special about init. It is a program just like any other on the Linux system, and you'll find it in /sbin along with other system binaries. The main purpose of init is to start and stop other programs in a particular sequence. All you have to know is how this sequence works.

There are a few different variations, but most Linux distributions use the System V style discussed here. Some distributions use a simpler version that resembles the BSD init, but you are unlikely to encounter this.

Runlevels

At any given time on a Linux system, a certain base set of processes is running. This state of the machine is called its runlevel, and it is denoted with a number from 0 through 6. The system spends most of its time in a single runlevel. However, when you shut the machine down, init switches to a different runlevel in order to terminate the system services in an orderly fashion and to tell the kernel to stop. Yet another runlevel is for single-user mode, discussed later.

The easiest way to get a handle on runlevels is to examine the init configuration file, /etc/inittab. Look for a line like the following:

id:5:initdefault:

This line means that the default runlevel on the system is 5. All lines in the inittab file take this form, with four fields separated by colons occurring in the following order:
# A unique identifier (a short string, such as id in the preceding example)
# The applicable runlevel number(s)
# The action that init should take (in the preceding example, the action is to set the default runlevel to 5)
# A command to execute (optional)

There is no command to execute in the preceding initdefault example because a command doesn't make sense in the context of setting the default runlevel. Look a little further down in inittab, until you see a line like this:

l5:5:wait:/etc/rc.d/rc 5

This line triggers most of the system configuration and services through the rc*.d and init.d directories. You can see that init is set to execute a command called /etc/rc.d/rc 5 when in runlevel 5. The wait action tells when and how init runs the command: run rc 5 once when entering runlevel 5, and then wait for this command to finish before doing anything else.

There are several different actions in addition to initdefault and wait, especially pertaining to power management, and the inittab(5) manual page tells you all about them. The ones that you're most likely to encounter are explained in the following sections.

respawn

The respawn action causes init to run the command that follows, and if the command finishes executing, to run it again. You're likely to see something similar to this line in your inittab file:

1:2345:respawn:/sbin/mingetty tty1

The getty programs provide login prompts. The preceding line is for the first virtual console (/dev/tty1), the one you see when you press ALT-F1 or CONTROL-ALT-F1. The respawn action brings the login prompt back after you log out.

ctrlaltdel

The ctrlaltdel action controls what the system does when you press CONTROL-ALT-DELETE on a virtual console. On most systems, this is some sort of reboot command using the shutdown command.

sysinit

The sysinit action is the very first thing that init should run when it starts up, before entering any runlevels.

How processes in runlevels start

You are now ready to learn how init starts the system services, just before it lets you log in. Recall this inittab line from earlier:

l5:5:wait:/etc/rc.d/rc 5

This small line triggers many other programs. rc stands for run commands, and you will hear people refer to the commands as scripts, programs, or services. So, where are these commands, anyway?

For runlevel 5, in this example, the commands are probably either in /etc/rc.d/rc5.d or /etc/rc5.d. Runlevel 1 uses rc1.d, runlevel 2 uses rc2.d, and so on. You might find the following items in the rc5.d directory:

S10sysklogd       S20ppp          S99gpm
S12kerneld        S25netstd_nfs   S99httpd
S15netstd_init    S30netstd_misc  S99rmnologin
S18netbase        S45pcmcia       S99sshd
S20acct           S89atd
S20logoutd        S89cron

The rc 5 command starts programs in this runlevel directory by running the following commands:

S10sysklogd start
S12kerneld start
S15netstd_init start
S18netbase start
...
S99sshd start

Notice the start argument in each command. The S in a command name means that the command should run in start mode, and the number (00 through 99) determines where in the sequence rc starts the command.

The rc*.d commands are usually shell scripts that start programs in /sbin or /usr/sbin. Normally, you can figure out what one of the commands actually does by looking at the script with less or another pager program.

You can start one of these services by hand. For example, if you want to start the httpd Web server program manually, run S99httpd start. Similarly, if you ever need to kill one of the services when the machine is on, you can run the command in the rc*.d directory with the stop argument (S99httpd stop, for instance).

Some rc*.d directories contain commands that start with K (for "kill," or stop mode). In this case, rc runs the command with the stop argument instead of start. You are most likely to encounter K commands in runlevels that shut the system down.

Adding and removing services

If you want to add, delete, or modify services in the rc*.d directories, you need to take a closer look at the files inside. A long listing reveals a structure like this:

lrwxrwxrwx . . . S10sysklogd -> ../init.d/sysklogd
lrwxrwxrwx . . . S12kerneld -> ../init.d/kerneld
lrwxrwxrwx . . . S15netstd_init -> ../init.d/netstd_init
lrwxrwxrwx . . . S18netbase -> ../init.d/netbase
...

The commands in an rc*.d directory are actually symbolic links to files in an init.d directory, usually in /etc or /etc/rc.d. Linux distributions contain these links so that they can use the same startup scripts for all runlevels. This convention is by no means a requirement, but it often makes organization a little easier.

To prevent one of the commands in the init.d directory from running in a particular runlevel, you might think of removing the symbolic link in the appropriate rc*.d directory. This does work, but if you make a mistake and ever need to put the link back in place, you might have trouble remembering the exact name of the link. Therefore, you shouldn't remove links in the rc*.d directories, but rather, add an underscore (_) to the beginning of the link name like this:

mv S99httpd _S99httpd

At boot time, rc ignores _S99httpd because it doesn't start with S or K. Furthermore, the original name is still obvious, and you have quick access to the command if you're in a pinch and need to start it by hand.

To add a service, you must create a script like the others in the init.d directory and then make a symbolic link in the correct rc*.d directory. The easiest way to write a script is to examine the scripts already in init.d, make a copy of one that you understand, and modify the copy.

When adding a service, make sure that you choose an appropriate place in the boot sequence to start the service. If the service starts too soon, it may not work, due to a dependency on some other service. For non-essential services, most systems administrators prefer numbers in the 90s, after most of the services that came with the system.

Linux distributions usually come with a command to enable and disable services in the rc*.d directories. For example, in Debian, the command is update-rc.d, and in Red Hat Linux, the command is chkconfig. Graphical user interfaces are also available. Using these programs helps keep the startup directories consistent and helps with upgrades.

HINT: One of the most common Linux installation problems is an improperly configured XFree86 server that flicks on and off, making the system unusable on console. To stop this behavior, boot into single-user mode and alter your runlevel or runlevel services. Look for something containing xdm, gdm, or kdm in your rc*.d directories, or your /etc/inittab.

Controlling init

Occasionally, you need to give init a little kick to tell it to switch runlevels, to re-read the inittab file, or just to shut down the system. Because init is always the first process on a system, its process ID is always 1.

You can control init with telinit. For example, if you want to switch to runlevel 3, use this command:

telinit 3

When switching runlevels, init tries to kill off any processes that aren't in the inittab file for the new runlevel. Therefore, you should be careful about changing runlevels.

When you need to add or remove respawning jobs or make any other change to the inittab file, you must tell init about the change and cause it to re-read the file. Some people use kill -HUP 1 to tell init to do this. This traditional method works on most versions of Unix, as long as you type it correctly. However, you can also run this telinit command:

telinit q

You can also use telinit s to switch to single-user mode.

Shutting down

init also controls how the system shuts down and reboots. The proper way to shut down a Linux machine is to use the shutdown command.

There are two basic ways to use shutdown. If you halt the system, it shuts the machine down and keeps it down. To make the machine halt immediately, use this command:

shutdown -h now

On most modern machines with reasonably recent versions of Linux, a halt cuts the power to the machine. You can also reboot the machine. For a reboot, use -r instead of -h.

The shutdown process takes several seconds. You should never reset or power off a machine during this stage.

In the preceding example, now is the time to shut down. This argument is mandatory, but there are many ways of specifying it. If you want the machine to go down sometime in the future, one way is to use +n, where n is the number of minutes shutdown should wait before doing its work. For other options, look at the shutdown(8) manual page.

To make the system reboot in 10 minutes, run this command:

shutdown -r +10

On Linux, shutdown notifies anyone logged on that the machine is going down, but it does little real work. If you specify a time other than now, shutdown creates a file called /etc/nologin. When this file is present, the system prohibits logins by anyone except the superuser.

When system shutdown time finally arrives, shutdown tells init to switch to runlevel 0 for a halt and runlevel 6 for a reboot. When init enters runlevel 0 or 6, all of the following takes place, which you can verify by looking at the scripts inside rc0.d and rc6.d:

   1. init kills every process that it can (as it would when switching to any other runlevel).

# The initial rc0.d/rc6.d commands run, locking system files into place and making other preparations for shutdown.
# The next rc0.d/rc6.d commands unmount all filesystems other than the root.
# Further rc0.d/rc6.d commands remount the root filesystem read-only.
# Still more rc0.d/rc6.d commands write all buffered data out to the filesystem with the sync program.
# The final rc0.d/rc6.d commands tell the kernel to reboot or stop with the reboot, halt, or poweroff program.

The reboot and halt programs behave differently for each runlevel, potentially causing confusion. By default, these programs call shutdown with the -r or -h options, but if the system is already at the halt or reboot runlevel, the programs tell the kernel to shut itself off immediately. If you really want to shut your machine down in a hurry (disregarding any possible damage from a disorderly shutdown), use the -f option. 

THANKS A LOT
Read More